From a modelling perspective, it is not a big problem to have highly
correlated features in the dataset. We have regularised Lasso/Ridge
regression that are designed to deal with this kind of dataset. The
ensemble trees are robust enough to be almost immune from this. Of
course all model requires proper hyperparameter tuning with proper
cross validation.
The problem raises in understanding the feature contributions: if
there are 5 features that are highly correlated, and their individual
contribute could be tiny, but their true contribution should be
aggregated by adding the contribution together and considered them as
a group, e.g. adding their coefficients in Ridge, and adding feature
importance in LightGBM.
If their aggregated feature importance turns out to be indeed little,
I can remove them from the model to have a simpler model. A mistake I
used to make is removing the correlated features based on their
individual feature importance, it leads to less performant models.
A better and cleaner approach is to the clean up correlated features
to begin with, then I won’t need to do the feature importance
aggregation, and it would speed up the model development cycle: there
are less features to look at, to train the model, to verify the data
qualities etc. When the model goes live in production, it translates
to less data to source and maintenance.
Implementation
So I need to enrich my tool set to identify highly correlated
features. I couldn’t find an existing library that does that, so I
implemented it myself.
The key steps are:
Based on the correlation matrix, create a correlation long
table. Each row stands for the correlation between feature $X_1$
and feature $X_2$. Assuming there are three features in the
dataset, the table looks like this.
Row
X1
X2
Corr
1
A
B
0.99
2
A
C
0.80
3
B
C
0.95
Remove rows if the correlation is less than the threshold $T$. It
significantly reduces the input to Step 3.
If the threshold is 0.9, then the Row 2 will be removed.
Treat the correlation table as a directed graph,
Let $E$ be the unexplored nodes, filled with all the features
$X_1$ in the start, $R$ is the result.
For each node in $E$,
Continue to travel the graph in depth-first fashion until
there is no connections left, and add the connected node to
the result $R$ at each visit.
Remove the connected nodes in $R$ from the remaining nodes to
explore in $E$.
The vanilla Python code corresponding to Step 3 is listed below. The
ds object is a pandas.DataFrame, multi-indexed by $X_1$ and $X_2$,
so ds.loc['A'].index gives all the connected features from $A$ whose
correlation with $A$ is large than the provided threshold.
deffind_neighbors(ds:pd.DataFrame,root:str,res:set):"""recursively find the nodes connected with root in graph ds.
"""res.add(root)ifrootinds.index:ns=ds.loc[root].index.tolist()forninns:find_neiboughr(ds,n,res)else:return[]deffind_correlated_groups(ds:pd.DataFrame):"""
The ds object is a pandas.DataFrame, multi-indexed by X1 and X2.
"""res=defaultdict(set)# contiune til all nodes are visited.
cols=ds.index.get_level_values(0).unique().tolist()whilelen(cols)!=0:# always start from the root as ds is directed graph.
col=cols[0]find_neighbors(ds,col,res[col])# remove connected nodes from the remaining.
forxinres[col]:ifxincols:cols.remove(x)returnres
The result is a collection of mutually exclusive groups. Each group
contains a set of highly correlated features, for example
Group A: {A, B, C}
Group D: {D, K, Z}
The next step is to decide which feature to keep and remove the rest
within each group. The deciding factors can be data availability
(e.g. choose the one feature with less missingness), costs in data
sourcing (e.g. free to download from the internet) or familiarity
(e.g. the feature is well understood by people) etc.
Parameterisation
There are two hyperparameters:
The correlation type: It can be Pearson for numerical data and Spearman
for ordinal/categorical data. For a large dataset, it would take
some time to calculate the correlation matrix.
The correlation threshold $T$: The higher the threshold, the less
number of features to remove, so it is less effective. However, if
the threshold is set too low, it leads to a high false positive
rate, e.g. two features can be correlated, but they can still
complement each other in the model.
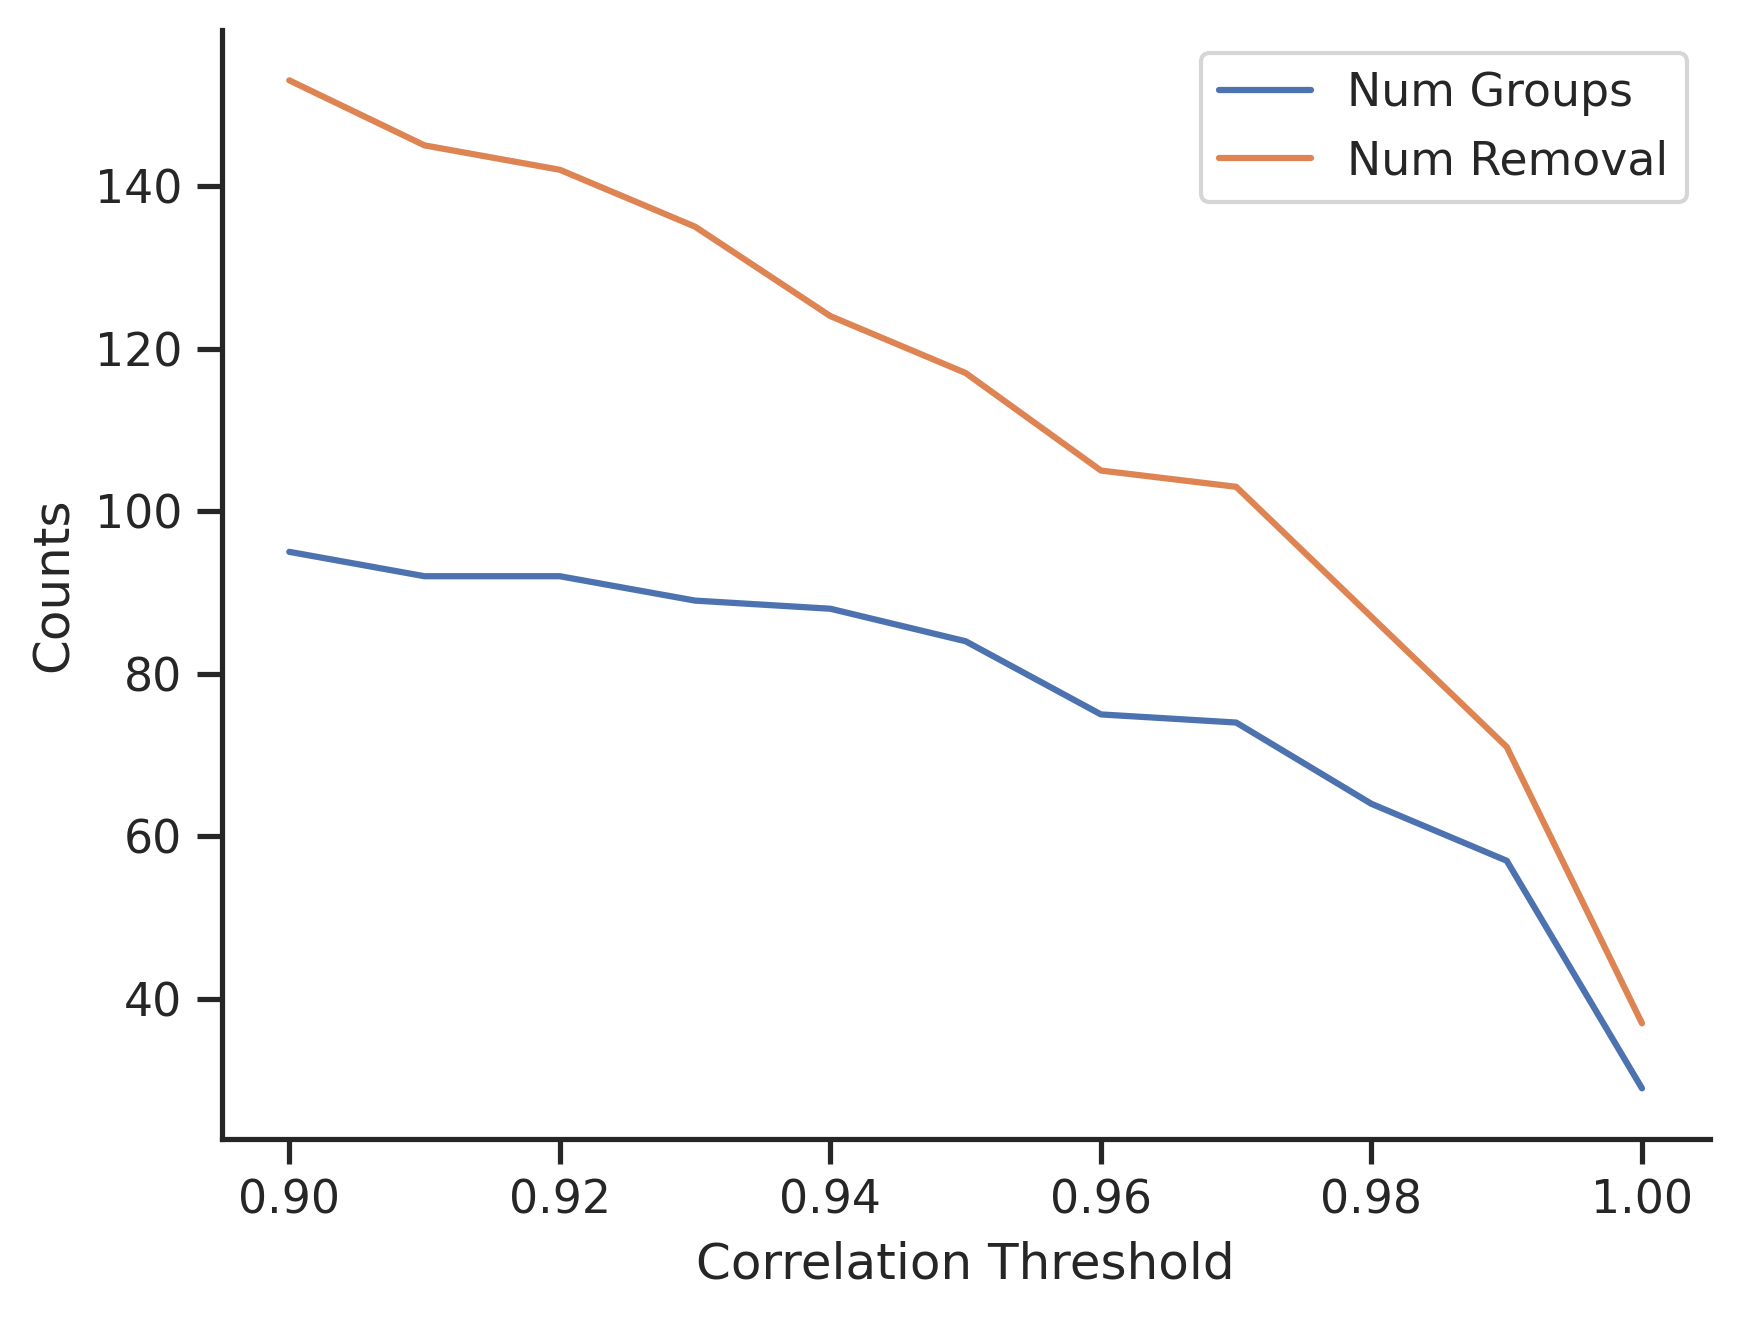
I would test a range of values from 0.9 to 1, and review the
results. Below graph shows the number of features to remove
with varying thresholds.
When $T=0.9$, there are about 95 groups, and in total 153 features to remove.
When $T=1$, there are 29 groups, and in total 37 features to
remove.
Proper end-to-end test runs are required to identify the best
hyperparameters. As a quick rule of thumb, those 37 duplicated
features identified with $T=1$ can be dropped without further testing.
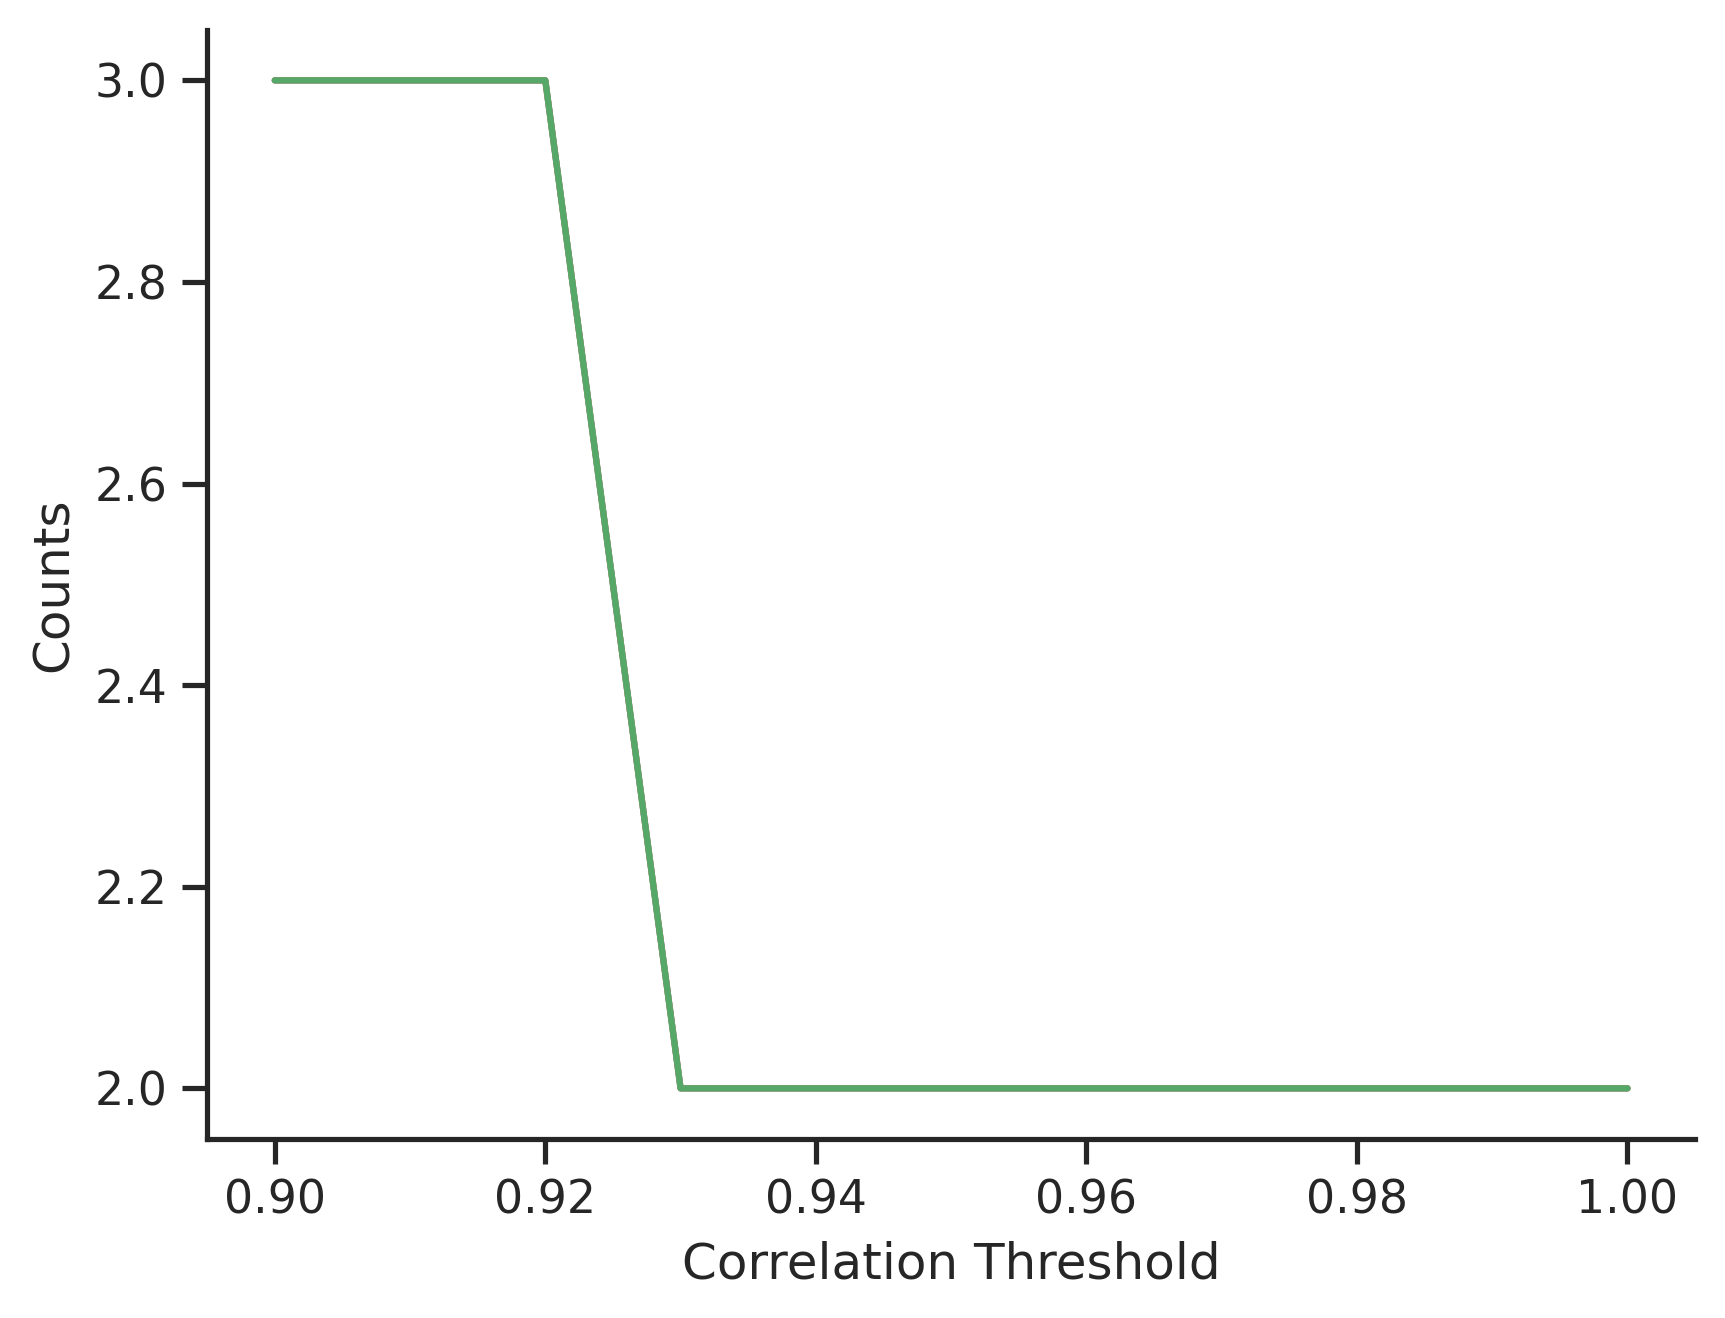
The group sizes with varying thresholds $T$ provide an interesting
insight of the data. The 75% percentile of the group sizes is plotted,
which suggests that apart from the 33 duplicated features, there are a
large number of paired features (i.e. group size is 2) whose
correlation is large, more than 92%.
Regardless of how powerful and convenient the R/Python data ecosystem
becomes, there is still value in looking at the data in Excel,
especially when exploring the data together with less technical
people.
Thanks to its trivial interface Excel is widely used in data
analysis: hoover the mouse to select columns, apply filters then
calculate some statistics. Most of the time that is all it takes to get
the answers the clients are seeking.
I recently realised that having transparency and working with the
tools that clients use plays a crucial role in strengthening the trust
and delivering the impacts to the business. Sometimes I think I should
do more in Excel.
But
The problem with Excel is reproducibility - I’m not able to codify the
clickings done in Excel and integrate them into the automated data
pipeline. It is rather foolish to have quality control procedures,
including code reviews, automated testing, CI etc in the system but in
the very end drop all those gatekeepers and go for error-prone manuals.
Plus it is way more efficient to have everything done in one place to
have a smooth process with no fractions. It is a key factor in
enabling quick turnaround.
So I had the motive to limit the usage of Excel to deliver data to the
business and pair data analysis. Again I have been looking into how
much it can be done without leaving Emacs.
Emacs Has More To Offer
I was pleased to discover the ess-view-data package and its Python
counterpart python-view-data. They interact with an active R/Python
session in Emacs and print out data.frame objects in plain text,
a.k.a. view data. What’s more, it can process the data before viewing,
for example, subset the data row/column-wise, summarise the dataset
etc.
The package keeps a record of the data processing pipeline so in the
end I would have a copy of the R/Python code that generates the
output. I can then effortlessly transfer the code to a script to
ensure reproducibility in the future.
Another benefit derives from having a plain text buffer for the data.
It is handy in exploring large datasets with an excessive number of
columns. For example, the dataset I work on daily basis has about 300
columns. It contains different flavours of the financials, the raw
values, imputed, ranked, smoothed etc.
It’s not possible to remember all the column names even after more
time was spent in giving meaningful names or ensuring the correct
columns are referred to. Having a persistent plain text buffer that I
can search for makes finding the right column names a lot easier. It
also helps to check what’s in and not in the data.
That’s my first impression of Shuguang Sun’s packages, it looks
promising.
I wasn’t aware of Jekyll’s draft mode. My workaround was manually
changing the published field in the front matter to true when the post
is ready to publish. It works fine. However, with naive support from
Jekyll, there are more benefits to using the draft mode.
To start with, I like the drafts saved in the _drafts folder, not
mixed with other published posts in the _posts folder. It is way more
cleaner and easy to manage. With a glimpse of my eyes, I can see what
are the posts that I am drafting.
It also gives a piece of mind: only posts under the _posts folder are
exported and shown in my blog. It ensures I don’t accidentally publish
a post in draft.
Once there are files in _drafts folder, adding --drafts argument to
the jekyll serve command is all I need to be able to see the drafts
locally.
Of course, I also need to write a bit of Lisp code to integrate the
draft mode into my blogging workflow. This is the remaining of this
post is about.
Implementation
For a blog post, I have the source file in org-mode and its exported
file in Markdown. Now there is a new location dimension: they can be
either in the _drafts or _posts folder.
mode
source file (org mode)
exported md in Jekyll
draft
org/_drafts/on_image.org
jekyll/_drafts/on_image.md
publish
org/_posts/2027_02_08_on_image.org
jekyll/_posts/2027_02_28_on_image.md
In terms of content, the published post and its final draft, and their
exported counterparts are the same, only in different locations. Their
content can be different to have some flexibility, e.g. published post
has higher resolution of screenshots. This feature is possible to
implement in the future. For now, I follow the simple “same but in
different places” rule.
The new process looks like this: When I publish a post, it moves the
org file from _draft to _posts folder, adds a date to the filename
(which I have already), and then triggers the exporting process. To
avoid duplication, it removes the original org file and its exported
draft in Markdown.
To achieve that, the main missing piece from my current Emacs
configuration is the yt/jekyll-find-export function (see
below). For a post in _drafts or _posts, it finds the full path of the
corresponding exported markdown file. I can then delete it or start
the exporting process.
(defunyt/jekyll-is-draft-p()"if the file is inside of the draft directory, it is a draft."(let((draft-dir(file-truenamejekyll-source-drafts-dir))(filepath(file-truename(buffer-file-name))))(string-prefix-pdraft-dirfilepath)))(defunyt/jekyll-find-export()"find the full path to the exported file of the current post."(let*((src-file(file-name-nondirectory(buffer-file-name)))(dest-file(file-name-with-extensionsrc-file".md")))(if(yt/jekyll-is-draft-p)(file-name-concatjekyll-site-draft-dirdest-file)(file-name-concatjekyll-site-post-dirdest-file))))
I do my best to keep my blog simple, I would not use images/videos
unless I can’t demonstrate well enough in plain text, for example, to
demonstrate a mobile app using a screenshot (Learn in Emacs - Building
Up Vocabulary) or how to represent stock price charts for neutral
network (Speed Up Sparse Boolean Data).
Even when I do, I keep the usage to the bare minimum: all I do is
insert the image, make it centralised, and put a caption on top of it.
The Org-mode supports images well, with a few additional HTML
attributes for each inserted image, I can fine-control the images’
position, alignment, size etc.
However, I can’t get the benefits because I migrated my blog posts
from HTML to the Markdown format for its simplicity. Plus Jekyll comes
with its little quirks when it comes to Markdown images. So I have to
write something for myself.
I managed to achieve a satisfactory workflow for my simple usage of
images in Emacs. It works well for the Jekyll site. Here’s the code
and explanation.
org-download : is the package that I use to create the images
for blogging from various sources.
I can drag images from external applications to Emacs, including
browsers, Preview, or iPhoto. The images will be saved in the
/project/assets/org-download folder per my matrix/project setup.
For the application that I can’t drag the images, I take a
screenshot inside Emacs by calling the org-download-screenshot
function.
yt/jekyll-copy-from-org-downkload: is a little helper function
that transfers the files under the org-download folder to the
/assets folder in a Jekyll site.
It lists the files in the source org-download folder and provides
them as a selection list. It comes with auto-completion and fuzzy
matches to help me choose the file.
It also strips out the special characters in the filename otherwise
the URL will be broken in Jekyll.
yt/jekyll-insert-image: lists the files in the /assets folder so
I can choose easily which image to use.
It brings up the Liquid template for image so I don’t have to
remember its syntax. It ensures the file path is in the correct
format (starts with /assets/), I just fill in the caption and size
after selecting the file.
An extract of the code is listed below for demonstration
propose. Future updates will be reflected in my .emacs.d git repo.
(defunyt/jekyll-insert-image(srccaption)(interactive(list(read-file-name"images to include: "jekyll-assets-dir)(read-string"Caption: ")))(insert(formatjekyll-insert-image-liquid-template(file-name-nondirectorysrc)caption)))(defunyt/jekyll-copy-org-download-to-assets(file)"copy file from project org-download folder to the blog assets folder.
it ensures there's no underscore(_) in the file name.
"(interactive(list(read-file-name"file to copy: "org-download-image-dir)))(let*((ext(file-name-extensionfile))(base(file-name-basefile))(dest-base(jekyll-make-slugbase))(dest-file(expand-file-name(file-name-with-extensiondest-baseext)jekyll-site-assets-dir)))(copy-filefiledest-file)dest-file))
Research shows having effective and rapid communication can boost
creativity and spark joy1. I believe in it from my personal
experience in conversing, reading a book in my native language or
trying to understand a large codebase.
I wasn’t enable to achieve similar results when it came to using
English. In the past I have been trying to improve my English language
skills to boost my productivity in reading books and to make it more
enjoyable. The approach was practising more in reading and writing.
However, I started questioning the effectiveness. This year I decided
to take one step back to focus on the basics and improve my
vocabulary.
I want to take the “slip-box” method2 which proved to be effective for
learning Emacs Lisp language. It is a bottom-up approach, so I would
have one note for each word with the explanation in it, links to other
similar words, or words I got confused with.
One advantage is that I can also leverage my existing setup.
Workflow for Building Vocabulary
When come across a new word that I’m not sure about its meaning, I
will
move the cursor to the word,
press F1 d to look into the dictionary, the result will shown in
the osx-dictionary buffer,
read its meaning and try to understand it,
press r to listen the pronunciation and read after it. I usually
repeat it a couple of times to deepen the memory,
press a to create an atomic note. it has the dictionary meaning
in it for future reference,
edit the notes to add my understanding and copy the
sentence/paragraph that contains the new word.
press C-c C-c to save it to my vocabulary database, which is just
a folder with flat org-mode files.
There’s quite a lot of automation so I can focus on understanding it
(Step 3) and write a good note (Step 6) in my own words.
This workflow depends on two Emacs packages:
osx-dictionary: it interfaces with macOS’s dictionary app. It
displays the meaning and says the pronunciation.
The package is well written and easy to work with; I managed to
extend it to add Steps 5-7 with little effort.
It has limitations: it works only in macOS and it only outputs one
dictionary. Adding the meaning in Chinese requires a few more manual
steps: 1) press o to open the Dictionary.app, 2) go to the Chinese
dictionary tab and copy the meaning, and 3) paste it to the note in
Emacs.
I personally find the Oxford dictionary macOS uses is not easy to
follow. From time to time I have to visit
https://dictionary.cambridge.org/ to find the explanation that I
could understand. In transforming my old vocabulary notes to the new
format, I found the explanation from vocabulary.com is the best. I
might have to resurrect my voca-builder3 package.
org-roam: it interfaces with org-mode for creating atomic
notes. It avoids duplication: if there’s a note for the word that
exists already, it opens the note, so I can have a look and enrich
it.
I can link notes/words in my vocabulary database which is very
useful because for me learning by comparing is super effective.
The org-mode provides a lot of functionalities that might be useful
to facility learning in the future.
Revision on Mobile Devices
Once I have a fleet of notes, the next step is to revise them on a
regularly. The routine I’m trying to get myself into is rereading the
notes I created for the last few days while waiting for the tube/bus,
I call it a revision break.
So far I have an Emacs lisp program4 that filters all my notes by time
so I have last_24_hours.org, last_3_days.org and
last_7_days.org. These files are synced with iCloud so they are
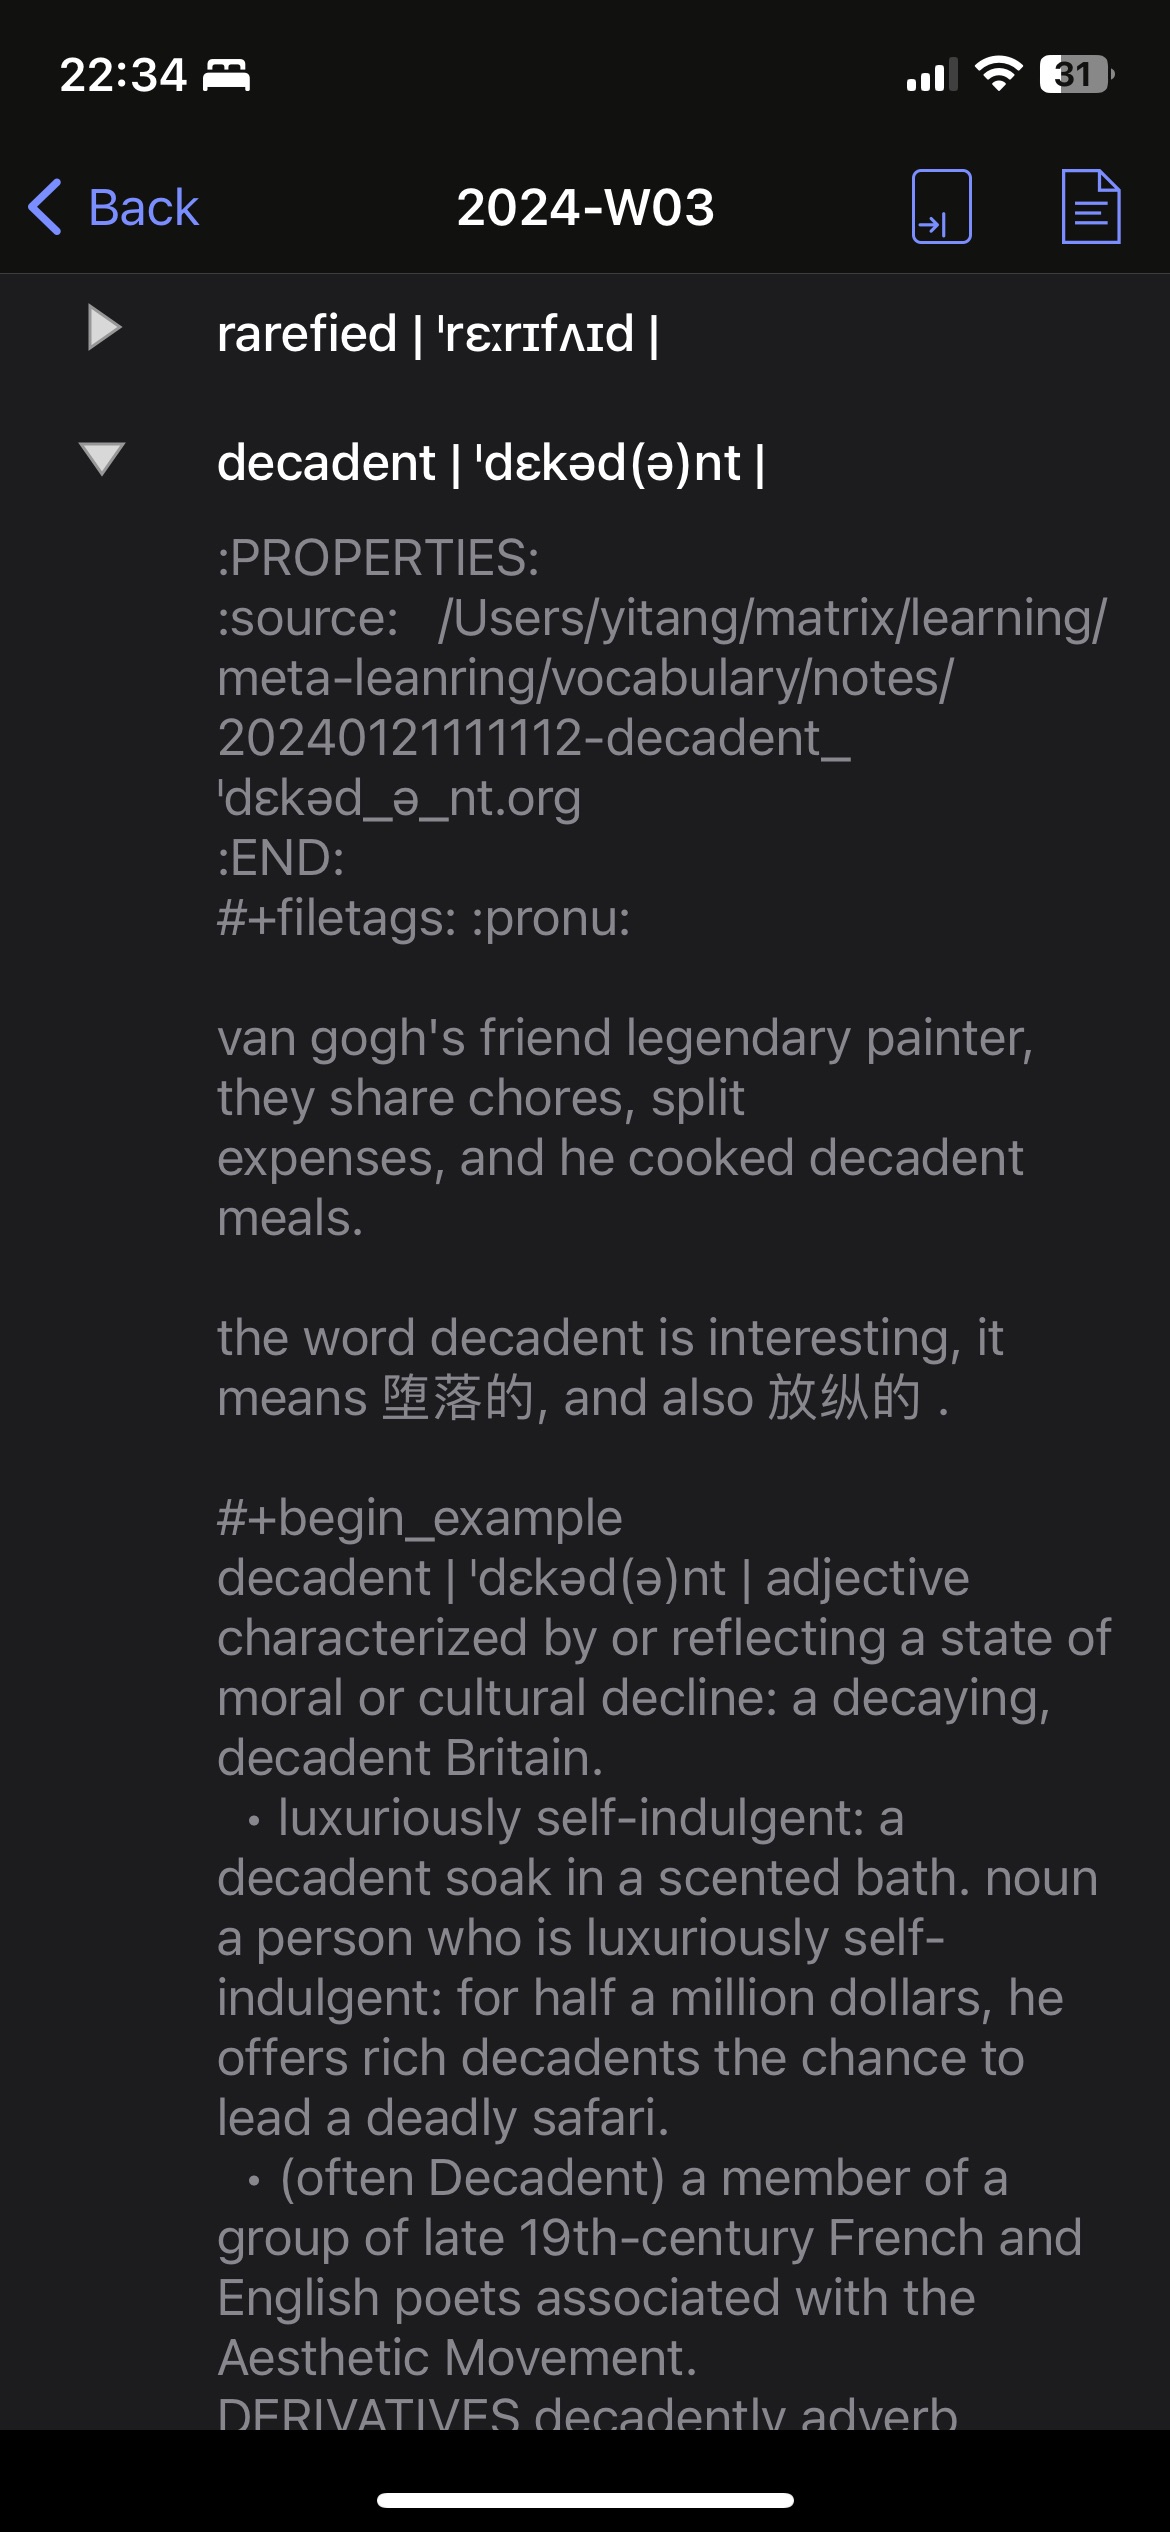
available to review on my iPad and iPhone using the beorg App.
Reading my vocabulary notes on iPhone
Org-mode Based Simple Study Strategies
For the dedicated study sessions, I need a few strategies to shortlist
the notes. I think They will be based on the metadata of the
note. With org-mode’s API, it should be easy to implement.
I haven’t done it yet, but the idea is to score the notes from 0 to 5,
5 means the most important notes so I would study them first, 0 means
not important notes so will be at the bottom.
There can be multiple scores, for example, one for pronunciation. the
word that I got the pronunciation completely wrong would get a 5, and
the word would get a 3 if sometimes I got it wrong, and sometimes I
got it right.
Another score is how many times I looked into the word. There are
words that I just keep forgetting about it, or keep confusing with
another similar word. So the property of ‘visited_at’ gets a timestamp
appended at the time of visiting and the score is calculated by the
number of timestamps.
Emacs Lisp Implementation
Adding an action to the headline in osx-dictionary’s buffer.
(require'osx-dictionary)(setqosx-dictionary-mode-header-line(append'((:propertize"a"facemode-line-buffer-id)": Add to vocabulary"" ")osx-dictionary-mode-header-line))
Adding yt/add-to-vocabulary to key a in osx-dictionary buffer. It
creates an note using org-roam.
(defvarvocabulary-repo-dir"~/matrix/learning/meta-leanring/vocabulary""where to save the vocabulary notes.")(defvaryt/voca--roam-template'(("d""default"plain"%?":target(file+head"%<%Y%m%d%H%M%S>-${slug}.org""#+title: ${title}
%?
#+begin_example
%(yt/osx-dict--get-meaning)
#+end_example
"):unnarrowedt))"roam template for vocabulary notes")(defunyt/add-to-vocabulary()"add a new vocabulary note for ther highlihted region or word at
point."(interactive)(let*((org-roam-directory(expand-file-name"notes"vocabulary-repo-dir))(org-roam-db-location(expand-file-name"org-roam.db"org-roam-directory))(org-roam-capture-templatesyt/voca--roam-template))(org-roam-node-findnil(yt/osx-dict--get-word-and-pronounce))))(defunyt/osx-dict--get-word-and-pronounce()"extract the word and its pronunciation from the *osx-dictionary* buffer"(with-current-buffer"*osx-dictionary*"(goto-char(point-min))(search-forward"|"nilnil2)(buffer-substring-no-properties(point-min)(point))))(defunyt/osx-dict--get-meaning()"wrap the *osx-dictionary* buffer cnotent as a string"(with-current-buffer"*osx-dictionary*"(buffer-substring-no-properties(point-min)(point-max))))(define-keyosx-dictionary-mode-map"a"'yt/add-to-vocabulary)
Footnotes
1 reference is lost; it is somewhere in the book “The Second
Mountain”, the chapter on religions.
2 from the book “How to Take Smart Notes”. I plan to reread this
book in early 2024.